
Who knew surviving as a teeny brown blob in Animal Well would be such a wild ride? Then again, when you’re just a dot, even birds and mice are out to get you. But nothing’s tougher than Animal Well‘s mind-melting puzzles. You’ll be staring at the screen, baffled by yellow switches, and unreachable platforms, and wondering where the heck you’re meant to go next.
Animal Well was my world for over a hundred hours of playtime, though I’ve seen some speedsters roll credits in just over two. At the risk of scaring you away, I recommend you skip the walkthrough unless you’re stuck. Don’t follow my steps; keep my instructions handy just in case. Dive in and make this adventure your own. Let’s conquer Animal Well, my fellow tiny blob.
**Updated June 1 2024**
Table of contents
- All Additional Guides for Animal Well
- Starting area
- How to beat Animal Well
- Chameleon Altar: How to get the V. Flame in Animal Well
- Dog Altar: How to get the P. Flame in Animal Well
- Ostrich Altar: How to get the G. Flame in Animal Well
- Fish Altar: How to get the B. Flame in Animal Well
- Final Area: How to beat the Ghost Boss
All Additional Guides for Animal Well
- All Egg Locations in Animal Well
- Every Tool in Animal Well
- Every Bunny Location
- How to Get the True Ending
Starting area

| Visual Reference | Instructions |
|---|---|
 | After you blossom into a tiny, brown blob, follow the squirrel to the right. You could head left an explore a secret area, but you can’t do much right now. |
 | Head down the short stairs and climb up the large stairs to reach the area above. |
 | Walk all the way to the left and climb on the platform to reach the ladder leading to the area above. |
 | Jump on the platforms on the waterfall to the left and head through the exit above. |
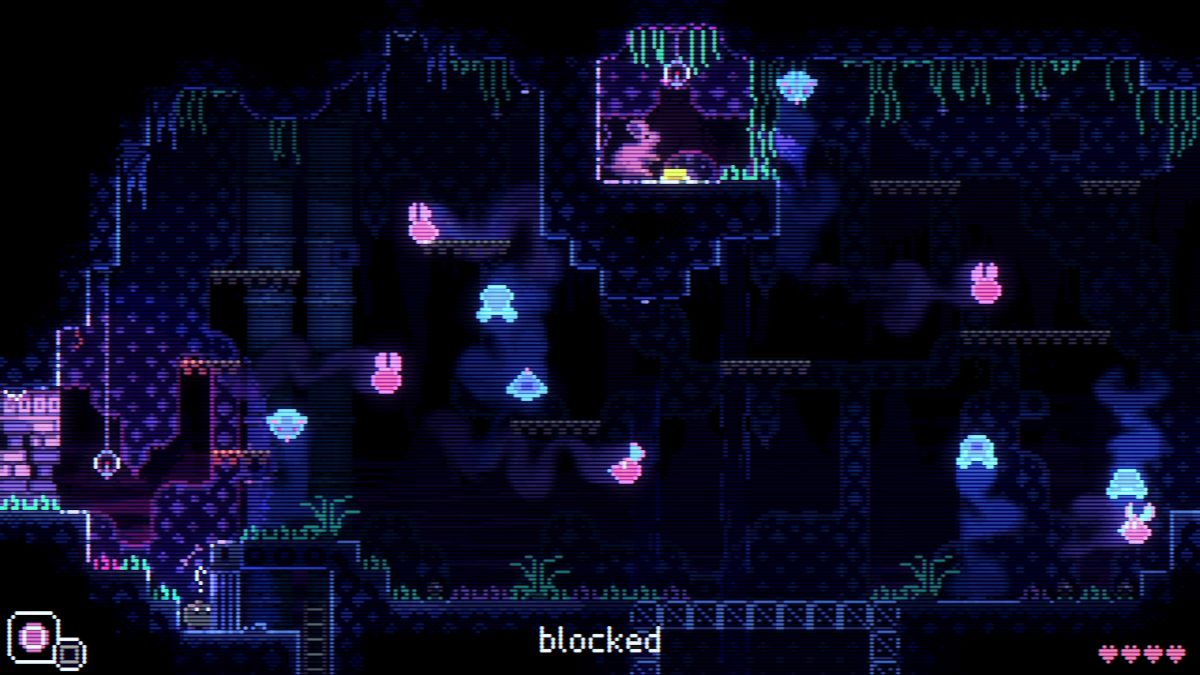
 | Welcome to your first Animal Well puzzle. To progress further, you must stand on all three yellow switches and open the cyan door on the far left. |
 | Aproach the crank on the end of the platform you’re currently on. With the arrow keys or buttons, you can lift a platform from underwater. Use it to reach the first yellow switch. |
 | From this location, head straight to the left to find a secret path below. (Under the blocked door). |
 | Once you reach the next area, drop down. Then, head to the right. |
 | When you get to this dead end, jump upwards. Then, jump to the platform on the left. |
 | Stand on the second yellow switch. That’s two out of the way, and one more to go. |
 | Head back up to the platform with the crank, and then exit through the right. Use the yellow telephone in the center of this area to save your progress. |
 | Approach the crank on the end of the platform you’re currently on. With the arrow keys or buttons, you can lift a platform from underwater. Use it to reach the first yellow switch. |
 | Use the platforms on the upper level to reach the area on the left. |
 | After using the moving platform to reach the other end, keep walking left. Yes, there’s a secret path there. |
 | Stand on the third and last yellow switch. Now you just have to drop down to the crank platform to lift the one that’s underwater. |
 | As you walk past the now unblocked door, jump to reveal a hidden area. In the treasure chest above, you can find a match. |
 | Pick up three firecrackers. You can throw these at ghosts. |
 | Use the platform behind the waterfalls to drop down. |
 | Keep heading to the right until you enter an arena with a blue ghost. Blue ghosts kill you on contact, so jump on the platform above and flee the scene. |
 | Use the platforms on the right side of this area to climb to the area above. |
 | Save your progress on the telephone. Head all the way back to the area where the first ghost haunt you. Use your newly acquired firepower to scare them away. |
 | Turn the pink crank to lift another platform. Then, climb up the ladder. |
 | To the left, you can find a path below the indigo animal that leads to your first unlit candle. |
 | While standing on the candle, jump to the platform on the upper right to find a chest with a Gorgeous Egg. |
 | To the right, you can find a treasure chest with a map. This map covers the entirety of Animal Well, but new areas only populate as you explore them. |
How to beat Animal Well

Let’s take a break to explore how Animal Well works. Though you never stop incorporating new tools and mechanics, once you get to this point, the tutorial is over.
You stand in the Room of the Altars. There’s no linear path you can take. Instead, you can choose to follow four paths: the Chameleon, the Dog, the Ostrich, and the Fish. Once you clear each path, you get a flame, which you can place on each altar to access the final boss.
The following sections guide out how to get each flame. You can follow the path of the Chameleon first, or skip ahead to the Dog and start there. That said, you might hit a point in a path that requires a specific tool you don’t yet have. That’s your cue to leave that animal’s path and explore a different one until you get the required tool.
Chameleon Altar: How to get the V. Flame in Animal Well

| Visual Reference | Instructions |
|---|---|
 | Use the yellow telephone on the area above to save your progress. Then, head to the right. |
 | Climb the long staircase to reach the area above. Once there, head all the way right. |
 | You can’t do much about the yellow switches or the Chameleon lurking above you, so just keep heading right. |
 | Jump past the waterfall gap. You can make it, just stand on the very edge of the platform. |
 | Porcupines deal damage. Firecrackers are useless. So, reach the area on the far right while avoiding them. |
 | Use the yellow telephone in the area above to save your progress. Then, head to the right. |
 | This Totoro-looking animal, a Chinchilla, is your friend, not foe in Animal Well. As long as physics allows for it, they will follow you. Use their aid to reach the chest in the center of the arena and get a key. |
 | Wait until the Porcupines leave the area. Then, lure the Chinchilla to the green staircase-shaped platform on the left. Jump on his head to reach it. |
 | Use the platforms in the raccoon area to reach the platform in the upper left corner. If you need it, you can grab a firecracker on the left. Then, climb up the ladder. |
 | To this areas’ right, you can find the Porcupine-in-a-box puzzle in Animal Well. You’ve got a Porcupine, a switch to manipulate his path, and three yellow switches that need to be stepped on. The Porcupine always walks to the left. Use the switch to alter his path until all the switches are pressed. Then, climb the ladder on the left and exit this area. |
 | Drop down and head to the area on the left. This is the Chinchilla carpet puzzle in Animal Well. |
 | First, climb the green, staircase-shaped platforms on the far left to lure the Chinchilla under the treasure chest. |
 | Then, stand on the green switch near the brown ladder to have the treasure drop down on its head. |
 | Next, climb the brown ladder for a short while to lure the Chinchilla to stand above the carpet. Once again, press the green switch to cause the Chinchilla to drop down. You can now open the chest and get a key. |
 | Climb the ladder and open the door to the right. |
 | Use the ladder in the next area to reach the area above. Here, save your progress on the yellow telephone. |
 | Head back to the area below and drop down the hole on the center. Here, stand on the yellow switch to open the door on the far left. |
 | The area on the left is pitch dark, and a trio of ghosts are chasing you. Use a firecracker to spook them. If you don’t have one, keep heading left until you find one on the floor. |
 | Once you’ve activated all three yellow switches, head through the unblocked door on the left. |
 | Then, climb the tall ladder to reach the area above. |
 | Your first priority here is to open the chest above the stair-shaped platform. This gives you a Slink, which you can use to keep switches pressed while you’re away. |
 | Drop the Slink on one switch, and stand on the other one. It doesn’t matter which. Then, go through the unblocked door and drop down. |
 | Stand on the wooden bridge on the left and throw the Slink. It’ll traverse through the staircase-shaped platform and press the yellow switch you can’t reach. |
 | Don’t just stand there. Make a run for the switch on the left to unblock the door above. Then, use the wooden platforms to reach the area above. |
 | Stand on the yellow switch before the locked door. Enter the room to the left and climb two sets of stairs to reach this area. If you stand on the tiny wooden bridge, you can reveal a secret path below. Throw the Slink here. |
 | Climb the platforms on the right to reach this area. Here, use the telephone to save. |
 | Head to the right until you reach this area. I’ll show you how to solve the puzzle in a bit. |
 | If you stick to the lower platform and head right, you can find a Chaos Egg. |
 | To hit the switch on the very left corner, throw the Slink while standing on the right corner of the wooden bridge while looking to the left. |
 | Use the platforms in the raccoon area to reach the platform in the upper left corner. If you need it, you can grab if a firecracker on the left. Then, climb up the ladder. |
 | To hit the switch in the center, throw the Slink while standing above the tiny gap in the center. |
 | As you enter the room above, you notice some Crows. They can’t hurt you. Keep walking left. Avoid the red button to keep the Crows on your good side. |
 | In the room to the left, we have another Slink puzzle. If you hit the red button by accident, exit the room and come back in to reset the Crows. To hit the yellow switch in the center, throw the Slink while standing on the lonely platform in the center and looking to the left. |
 | To hit the yellow switch on the right, stand on the right wooden platform and drop the Slink on the yellow switch directly below. |
 | To hit the yellow switch on the left, stand on the left wooden platform and drop the Slink on the yellow spring directly below. Bye, Crows, we’re out of this room. |
 | Throw the Slink down this wooden bridge to hit the yellow switch. |
 | Follow the Porcupine’s movements as he lifts the boxes to move to the right, and then backtrack to the left. |
 | In this room, you have to throw the Slink down the stairs below and traverse the area above timely. It might take a few tries, but you’ll get there. |
 | Once you manage to get to the ladders, climb them, trigger the yellow switch above, and climb the yellow springs to reach the next area. |
 | Here, throw the Slink down the stairs and make a run for the box with the x-symbol on the left. |
 | Jump to activate the yellow switch above you. Then, run to the left, pick up the matches, and exit the room. |
 | For this puzzle, you need the Yoyo, a tool you get by pursuing the path of the Ostrich. Stand on the left end of the cliff and throw your Slink, then run to the tiny wooden bridge on the right, equip the Yoyo, and press the yellow switch to open the door on the far left. |
 | Climb the platforms to reach the area above. To the right lies the flame, but you can’t reach it yet. |
 | In this room, use the Yoyo to hit every switch. Don’t forget to save. |
 | Walk past the room with the cliff. For this puzzle, you need the Animal Flute in Animal Well. Find eight eggs and unlock it in the Egg Room to proceed. Stand in front of the Chinchilla and play the Animal Flute to wake it up. Then, lure it to stand on the square green switch while you make a run for the floating box. |
 | To get past this room, you must lift the boxes blocking the way by pressing green switches square and equal symbols. You can probably guess that the Slink can trigger the switches below, but those two Possums won’t give it a rest. First, use the Yoyo to lure the possums to the very right part of the room. Then, throw the Slink so it starts hitting the switches. Switch back to the Yoyo and lure the Possums to the right again as you exit the room. |
 | Stand on the short wooden bridge and drop your Slink. Here’s what you need to do to guide it to the green switch: First, stand on the box with the square symbol. Then, stand on the box with the equal symbol. Next, jump back to the box with the square symbol. Last, stand on the box with the X symbol but just lift it slightly so it pushes the Slink into the switch. |
 | Here, stand above the gap on the platform below. Use the Yoyo to lure the Chinchilla to the spiky floor. Don’t worry; they don’t take damage. Then, drop down and stand on it. You can use the Yoyo to lure the forward and reach the area to the left. |
 | Stand on the yellow switch, use the wooden platforms above you, and make your way left to exit two areas. |
 | Jump out of this area, and exit through the upper platform on the left. |
 | Use the Yoyo to hit the yellow switch above you. |
 | Re-enter the area on the right, lure the Chinchilla out of the entrance to the area above again. In this area, stand on the wooden bridge to the left to lure the Chinchilla on the upper platform. Then, make a run for the area below to get the Swan Egg. |
 | Exit to the area on the left and use the Yoyo to reach the yellow switch above you. |
 | Drop the Slink on the green switch past the now unblocked door. Then, drop down the hole in the center. |
 | It’s our friend the Chameleon, again! To beat the Chameleon in Animal Well, stand in front of the first Porcupine in the line. When the Chameleon sticks out his tongue, run away. You can do this twice or thrice before the Porcupines are out of reach, just wait until they circle back and repeat. |
 | Once the Chameleon has swallowed all the Porcupines, he retreats. Jump left to get the V. Flame. Break the glass with the Yoyo. |
Dog Altar: How to get the P. Flame in Animal Well

| Visual Reference | Instructions |
|---|---|
 | Starting from the Room of the Altars, head to the left, and climb the stairs to reach the area above. |
 | To the left here is the Egg Room. To get to the Dog Room, keep climbing the stairs above. |
 | This is the Dog Room. Come in and follow the Squirrel to the left. |
 | Do not, under any circumstances, touch the Disc on the Cat statue. We have stuff to do first. |
 | Follow the path left and above. Be careful with the dog! You can exit either way, so do what’s safe for you. When ready, climb the stairs on the right to reach the area above. |
 | Use the yellow telephone to save. Then, stand on the platform above to reach the moving platform and exit through the left door. |
 | Dogs aren’t your friends. Drop down and hide in the hole to the right. Then, exit through the left. |
 | If you’ve got the Animal Flute, you can light up the path with your music. If not, throw Firecrackers to guide the way to the left and then downward. |
 | Then, head straight to the right. When you spot a ghost, throw a firecracker. There’s a match you can light up exactly where it spawns. |
 | Head to the room on the bottom left. There’s a crank you can use to lift a block on the lower left corner and exit through there. |
 | The switches in this room activate the platforms. Start with the switch facing right and head to the left. |
 | Keep heading right, avoid the dog, and climb down the stairs to find the cat statue again. After you swap Discs, head to the left and climb the stairs to go back to the wiener dog. Throw the Disc at him to explore the area below him. |
 | Nothing to do here. If you switch, you drop. Keep heading to the right and use the next switch to reach the platform on the upper right. |
 | Open this golden chest to get the Mock Disc in Animal Well. Remember that cat statue I warned you not to touch? Time to swap Discs. |
 | Nothing left to do here. Head all the way back to the right past the wiener dog. Before you proceed, I recommend you pursue other paths until you get the Yoyo, the Slink, and the Bubbles Wand. When ready, climb the platforms above the wiener dog room. |
 | As you stand on the far right, jump on the vines on top of you to reveal a secret area. There’s a chest with a Sour Egg on the right. |
 | Head back up to the surface and stick to the left to return to the switch levers puzzle. While standing on the lever, throw your Disc to the left. Jump and stand on it to reach the platform on the left. |
 | To solve this puzzle, stand in between the Chinchillas and throw the Disc. As you stand on it, the Chinchillas are pushed back until they both stand on the switches. Inside the chest below, you can find a Red Egg. |
 | In the next room, throw the Disc in between the switches to trigger the platforms on the left to move. Climb them by following the rhythm of the switches. |
 | Throw the Disc at the dog to avoid damage. |
 | On the next room, throw the Disc in between the switches to trigger the platforms on the left to move. Climb them by following the rhythm of the switches. |
 | Up here, throw the Disc in between the switches to the right to traverse the area above and unlock access to the area with the three dogs to the left. |
 | To the right, you find a ghost, so be ready to throw some firecrackers or light the match above it. We’ll get back to this missing treasure once we’ve got the Lantern in Animal Well. |
 | To the bottom left, you can find a treasure chest with a match. |
 | By following the path on the very top platform and to the right, you find a yellow switch on a new room with a telephone. |
 | Then, to the right, you can find a treasure chest with matches and an explosive to create a shortcut to the left. If you have the Bubbles Wand, you can feed the fish head a bubble to teleport to the lever puzzle. (Explored in the Ostrich Altar section) |
 | Head back up. This is a puzzle you need to solve with the Slink while avoiding the Crows. Crows only attack you if you hit the red buttons. Stand on the left corner of the wooden bridge and look to the left. Here, drop the Slink to hit the yellow switch below. By following the Doglevator to the right, you can get the other Match from a chest. |
 | Head back to the area with the three dogs. While standing above them, throw the Disc to distract them. Now, safely make your way to the ladder to the left. |
 | Drop down here to reach a new area. |
 | Here, either use the Disc to break the three big spikes or use the Bubbles Wand to climb over the platform. |
 | In the next room, throw a firecracker to spook the Ghost. Step on the switch on the far left to open the door above. If you want some extra light, light up the candle on the lower left. |
| If you leave through the room to the left, you can find a puzzle. Use the crank to lift the skull box and lift the Chinchilla to the first light switch. |
 | Move to the left side to lure the Chinchilla to the skull box again. Then, head back to the crane and lift it to the top to press the second light switch on the right. |
 | Move to the left side again as the skull box goes down to lure the Chinchilla to the top left light switch. |
 | Let the Chinchilla stand on the bottom right while hole you pull the skull box up. Then, lure her to the left before the skull box drops. |
 | If you go up the ladder, you can find a room with a Bat. Light up the candle in the center and look for an exit to the right. |
 | Jump to unlock the door in the room to the right. |
 | Backtrack left and upward until you find yourself in the room with the two dogs. Here, head to the left. |
 | Throw the Disc at the dog, then use the crank to lift the skull box to the left. Run to reach the ladder before the skull box slams you to death. |
 | Above, head left to reveal a room with a yellow telephone |
 | If you use a Disc here, you can reach a treasure chest. |
 | While standing on top of these stairs, throw the Slink and run to the box on the right to reach the area on the upper right. |
 | Here, you should throw your Disc through the hole on the lower left and throw your Slink while standing above the wooden bridge to propel it upward and hit the yellow switch. Inside the treasure chest lies the Reference Egg. |
 | Now, getting the chest in the room to the right is a bit tricky. Here’s how to solve this puzzle in Animal Well: First, throw the Slink down the stairs on the right. Sprint to the box with the equal symbol. Before the box slams you to death, throw the Slink down toward the green switch. Then, sprint to the right to make it to the other side of the box with the X symbol. Inside this chest, you can find a Brown Egg. |
 | Throw the Slink on the square switch and jump on each box until you reach the platform on the upper right. |
 | Keep heading to the right until you’re in this room. Use the crank to raise the skull boxes and climb them to reach the area on the upper right. |
 | Pull the switch and enter the area to the left. Here, stand on the platform in the center and jump to press the green switch. |
 | Use the wooden platforms on the far right to reach the ladder above. Then, head to the area on the right. |
 | I tried to keep you safe for as long as I could, but now, it’s time to reach for that Disc you swapped on the cat statue below and place it here. |
 | As soon as you take the Disc, a Ghost Cat will spawn. This creature doesn’t know a thing about boundaries and it will chase you anywhere you go; there’s no escaping it. I could tell you which path I followed, but what works best against the Ghost Cat in Animal Well is practice. Know your way from the Cat Statue to the Disc Shrine. Try over and over until you get it right. If you’re feeling down, just know it took me eight hours straight to get this right. I’m sure you can do better. You’ve got this. |
 | With the Disc in place, you can access the P. Flame. Break the glass with your Yoyo. |
Ostrich Altar: How to get the G. Flame in Animal Well

| Visual Reference | Instructions |
|---|---|
 | From the Room of the Altars area, head right past the Duck. Quack to you too, buddy. |
 | Navigate the switching platforms until you reach the exit in the lower right corner. |
 | When you get to this corner, jump to the wooden bridge above. |
 | Jump to the left and hit the yellow switch near the bunny. Then, exit the room through the now unblocked door on the lower left corner. |
 | Fly past the platform on the right, jump on the platform, and on the second bird. |
 | To the left, you can find a telephone and a shy Raccoon. The door’s blocked, so nothing to do here. Exit the mouse pedestal room to the right. Here, follow the ladder leading downstairs. |
 | Follow the path to the right and get across the room with cyan floating heads. The goal is to reach the mouse with the switch on the upper left. When you’re ready, head back up and to the room on the right. |
 | These white spirit birdies are your new besties: they’ll catch you if you fall. That said, they also won’t let you reach that lever on the upper right. |
 | Fly past the platform on the right and jump on it. Then, jump on the white birdie to your left. |
 | Spirit birdies dematerialize when they stand on the light, so if you fly near the hanging lamp in the center, the bird on top disappears. Use this to your advantage to jump on top of it. All that’s left is to pull the lever. |
 | Use the ladder in the room to the left to reach the area above. More floating heads! To get past this area in Animal Well, wait until the two columns of heads clash on the left side. Then, hop on the platform above you and make your way to the upper right while staying in between both head columns. Pull the lever and get out of here. |
 | Back at the mouse altar, drop down the ladder at the center. Time to stand on some switches, but be careful not to touch the spirit mouse lurking nearby. |
 | Head to the left past the now unblocked door. Stand in the hole behind the black pillar to find a secret room and press the yellow switch. |
 | Before proceeding to the left, use the wooden platforms to climb above until you reach the room with the pink floating head. Behind the waterfall lies a switch, use it to trap the floating pink head in between the two pillars to the right. |
 | The trapped head triggers a second switch that lets you reach the mouse with the chest. Inside, you find a key. If you haven’t unlocked the Disc and Bubbles Wand yet, consider following other paths before you continue. |
 | Time to head back downstairs and pass to the unexplored room to the left. Here, the Ostrich and her long neck await you. To beat the Ostrich in Animal Well, you must use the holes below her to your advantage. That said, you can’t take too long. You see, that long neck is not just for show, it’s for hunting prey as well. |
 | Enter the first hole to the right and look for the first yellow switch in the bottom right corner. Throw a firecracker to get the Ostrich to retreat. |
 | Enter the last hole to the left and look for a yellow switch near the surface to the right, and then one to the left. Again, firecrackers can help you exit safely. |
 | Enter through the hole in the center to find one last switch on the bottom left. That’s four switches to unlock the door. See you later, Ostrich. |
 | When you get to the next room, use the Disc to reach the treasure chest on the other side and get a Fire Egg. Then, drop down. |
 | Keep heading to the right until you spot an area with a green treasure chest. Open it to find the Yoyo, the tool that reaches the smallest of corners. |
 | Head back to the room to the left, and use the Yoyo to press all the yellow switches. Then, exit through the door on the upper right. |
 | Get on the white birdie and climb the ladder to reach the area above. |
 | Here, jump on the platform on the right and use it to reach the bird above. Use the Yoyo to hit the yellow switch on the left. |
 | Keep heading to the right until you reach a room with floating heads. They deal damage, so try to reach the other end of the room without touching them. |
 | Use the Yoyo to hit the yellow switch on the ceiling. |
 | Use the platform on the far left to ride the white birdie that’s flying above the rest. With their help, you can reach the area on the upper right. |
 | Drop down to the white birdie at the center and head to the platform on the left. |
 | Circle to the white birdie at the bottom and move to the platform on the lower right. |
 | Here, use the Yoyo to hit the yellow switch on the other side of the door. |
 | Exit through the door on the upper left. In this room, stand on the tiny platform to the upper right near the purple enemy. Use the Yoyo to break through the spiky area and hit him on the back. Lure him out and open the chest to get a key. |
 | Jump on the platforms in the upper left corner and use the Yoyo to trigger the yellow switch on the far left. |
 | When you’re ready, go back to the door with the Frog head you unlocked and walk down the path at the bottom left. |
 | Head downward and to the right to find the lever puzzle. Use the levers to create a sound wave that hits all three circles. When you do, you get access to a treasure chest with the Jade Egg. |
 | Head to the left and climb upward to find the Rust Egg. |
 | Then, head back up and exit through the door on the right. If you see a spooky Kangaroo, exit and re-enter the room. |
 | Use the elevator to reach the upper area. Once you get to the very top, get off and sprint to the right before you get squished. |
 | Then, wait for the platforms to circle back before making your way up and to the left. |
 | Before you jump to the spikes, equip the Yoyo and destroy them. Then, use the Yoyo to hit the green switch and drop down. |
 | Here, stand on the yellow switch to open the door to the right. Use the Yoyo to draw the mouse’s attention to the left. This causes the platforms to move downward instead of upward. |
 | Head downward and use the pink mouse platforms to head to the left. |
 | Climb the wooden platforms and throw a bubble at the fish head to transport to the room nearby. |
 | To progress, you must activate three yellow switches in this room and unblock the door on the lower right. |
 | On the room to the left, break the spikes with the Yoyo, drop down, and circle back to the right using the platform in the middle. When you get to the other room, use the Yoyo to activate the yellow switch. |
 | Use the Yoyo to hit the four switches in the room to the right. Remember you can change the direction toward which the pink mouse platform spins by luring the mouse on the wheel to one side or the other with the Yoyo. When you’ve hit all four, the door in the upper left corner opens. Hit the yellow switch up here. Make sure the pink mouse platforms are moving to the right when you leave. |
 | On the room to the left, jump down and follow the pink platforms to the right. You’ll have to break some spikes, so keep the Yoyo equipped. |
 | Head back to the Giraffe room. If you exit through the door on the upper right, you can jump in an explosive and create a shortcut. These are your best friends in Animal Well. |
 | Lure the mouse inside the wheel to the opposite side so the blue mouse platforms move upward. Then, head to the left and travel back down using the fish head. |
 | Jump on the pink mouse platforms to the left as they move to the right. As you reach the room with the caged cats, head to the right and lure the caged mouse to the opposite side to get the pink platforms to move to the left. |
 | Enter the room to the left and head to the top platform by following the moving mouse platforms. Once you get to the top, avoid the floating heads to reach the final yellow switch. Only use the green switch above when you want to drop down. I learned this the hard way. |
 | As you enter the new room, make sure you save on the yellow telephone. Activate the green switch on the room on the far left so the whale propellers work. Then use the Bubbles Wand to reach the passage on the upper left. |
 | Here, jump on top of the cats and balance the cages to reach the wooden platform on the far left. Stand on the yellow switch. |
 | Then, stand on the yellow switch below the caged Ostrich to make the Ostrich boxes move to the left. Next, stand on them to reach a new area. |
 | In this area, use the Bubbles Wand to reach the Ostrich boxes above and travel to the right. Then, stand on the yellow switch. |
 | Stand on the switch below the Ostrich cage to free her. |
 | Then, run to the right until she falls on the carpet trap. |
 | Enter the door on the lower right to get the G. Flame in Animal Well. |
Fish Altar: How to get the B. Flame in Animal Well

| Visual Reference | Instructions |
|---|---|
 | Starting from the Room of Altars, head to the left past the fish statues. |
 | Drop down the exit on the lower left corner and walk past the flamingos. |
 | Turn the cranks to match the picture so the droplets fall inside the cup with the I symbol. |
 | Go through the upper left exit. In the room to the left, drop down and use the droplets to reach the passage on the upper left. |
 | Tip: If you use the Disc you can get the Normal Egg in a chest. |
 | Repeat these steps in the next room and reach for the ladder. Above, stand on the green switch. |
 | Use the propellers to reach the yellow switches on the ceiling. Then, exit through the now unblocked door on the upper left. |
 | Keep heading left, save on the yellow telephone, and head down the ladder. |
 | Here, head all the way to the right and down another ladder. Careful with the spikes! If you’ve got a Yoyo, you can break them and reach a secret area on the lower left |
 | In this room, use the bubbles the Seahorse creates to hit all three switches on the ceiling. Then, use the bubbles to reach the unblocked door on the upper left. |
 | In this room, grab the Bubbles Wand. This tool makes traversal much, much easier. Exit through the upper left passage. |
 | Keep heading left. Use the Bubbles Wand to reach the first platform on the right, and make your way to the upper left. |
 | Here, use the Bubbles Wand to hit the square switch and activate the whale propellers. |
 | Throw a bubble into the propeller and jump on it to reach the second propeller. Then, repeat the process once again to exit through the upper left passage. |
 | On the room above, look for a secret passage past the vines on the left. Hit the square switch to activate the propeller. |
 | With the propeller’s help, get to the top of the platform in the center. Then, spawn a bubble and hop on it as you float downward and reach the area on the right. Repeat the process and exit through the passage on the right in the area below. |
 | Use a bubble to safely land here. Then, stand on the platform on the right and throw a bubble at the fish head. You won’t believe what happens when you jump into its mouth. |
 | Isn’t that crazy? You’re now somewhere completely new. Here’s how to solve the fish room puzzle in Animal Well. Tip: The first bubble you spawn goes directly into a fish’s mouth, but the second one helps you jump higher. |
 | Use the Bubbles Wand to reach the fish at the very top. As you stand on its head, jump to reach the first yellow switch. |
 | Feed a bubble to the fish head on the left to get to the other side. Here, feed a bubble to the fish on the left to get to another area. |
 | When you get to the new area, move to the left to activate the second yellow switch. Exit through the same fish head you came from. |
 | Back on the first area, feed a bubble to the fish on the upper right. When you get to the other side, climb to the left and stand on the last yellow switch. Just drop down and use the fish head at the bottom to head back and open the chest. You’ve now got the Magic Egg. |
 | Get out of here via fish head and go back to the fish area with bubbles. Now that you’ve got some extra help, you can reach the area on the right. |
 | While using the Bubbles Wand, head all the way right to find a chest with the Great Egg. Then, you’ve got to come back to the left. |
 | Now that you’ve got your Bubbles Wand, you can conquer this switch puzzle. |
 | Make your way to the top. When you get to the top right platform, throw the Disc. Then, make your way to the very top left platform and use the switch to the path to the right that is unblocked. The last step is to jump on the Disc and make it to the right exit. Here lies the Virtual Egg. |
 | Exit through the right and make your way back inside the path of the Fish and go all the way left past the bubble section. When you get to the room in the picture, throw a bubble into the void and jump on it to descend slowly. |
 | Throw a Disc to the switch on the left here. |
 | Jump on the platforms on the right and, as you stand on the top, throw a Disc at the switch. Be ready to jump to the right before you fall. |
 | This bird won’t let you use your Bubbles Wand. Instead, throw a Disc at the platform to your left. When it circles back, stand on it to reach the squirrel on the right. |
 | Save on the yellow telephone. Then, head right and upwards. Break the spikes with your Yoyo. |
 | This Penguin is your frenemy. If he touches you, you take damage. That said, if he belly-slams the spikes, he clears the way for you. Stand on the hole at the center to avoid damage. |
 | Below and to the right lies a ghost, but if you spook him with a firecracker, you unlock the path to a chest with the Goodnight Egg. |
 | When you drop down below, go to the lower right corner of the area and drop your Slink on the yellow switch there. Sprint for the yellow switch on the far left, and leave the one on the center for the belly-slamming Penguin. |
 | After hitting the switch to activate a shortcut, head down the ladder. The puzzle below is a bit tricky. You’re meant to use three cranks to align the ramps and lead the water to the fountain with the I symbol. That said, only one crank is in the room, the other two are in the rooms to the left and to the right. |
 | To solve the puzzle in the room to the right, follow these steps: First, climb on the box with the square symbol and wait for the Penguin to step on the switch on the right. Once you’re up, place the Slink on the switch above and drop down. When the box with the square symbol rises again, stand on the switch with the equal symbol. This causes the whale propeller to spin and, eventually, the Penguin hits the yellow switch. |
 | To solve the puzzle in the room to the left, throw your Disc inside the area in the left corner and stand on the green switch. |
 | Here’s how you should align the ramps in the path of the fish to solve this puzzle in Animal Well. |
 | With the door unblocked, head down the ladder. Here, just use your Bubbles Wand to reach the area on the left. |
 | To solve the yellow switch puzzle here, throw your Disc so it bounces between the left wall of the structure and the purple square on the right. Then, stand on top of the structure to lure the whale. |
 | Carefully drop down on the void to the left using a bubble as support. |
 | This second puzzle follows the same structure as the one above, but because the Seahorse keeps moving, you’ll have to move the ramps as you see fit to fill the cups with the I symbol. |
| When the door is unblocked, go through to get the B. Flame, which you can break with your Yoyo. |
Final Area: How to beat the Ghost Boss
| Visual Reference | Instructions |
|---|---|
 | Once you place all the flames on the altars, a secret room is revealed at the center. Drop down to face the final boss in Animal Well. |
 | Here, turn the crank to reveal a platform on the right. Then, stand on that platform and turn the crank to lift the skull box on the left. |
 | Make your way down through the darkness. When you get to this room, don’t try to get to the chest. Just save and exit through the upper left passage. |
 | Be extra careful of the shadows and head to the right through both rooms. |
 | Upward lies a shortcut to the telephone. Below, there’s a puzzle to solve. |
 | Throw the Slink down the hole on the right. Sprint down the hole in the center. |
 | Toss your Disc through the hole on the right and quickly switch to the Bubbles Wand. |
 | Use bubbles to reach to top left corner and drop down. Now, you can exit through the upper left passage. |
 | Back in the Crocodile room, jump on the wooden platform to reveal a secret room. |
 | Lure the Rat to the green switch on the right. As he lifts the box with the square symbol, exit through the upper left and stand on the yellow switch outside. |
 | Back in the first room with the shadows, look for an exit on the upper left. |
 | Up here, drop the Slink on the upper right, let the Rat stand at the center, and sprint to reach the missing one on the left. Drop down to hit the last yellow switch. |
 | Go through the now unblocked door on the upper right and look for the chest behind the white bird. Inside, you can find a Lantern. Now ghosts and shadows run away from you. |
 | With the Lantern equipped and activated, spook the ghosts blocking the path in the room of the Crocodile to reach the final boss. |
 | Stand on the yellow switch on the island, throw a Disc at the one on the right, use the Yoyo on the switch below you, and use the Bubbles Wand to reach the last one on the left. Time for the final showdown. Or, rather, your first attempt at it. |
 | To beat the Ghost Boss in Animal Well, you’ve got to open the door on the right. This takes four yellow switches, but most only open once you hit certain switches. To simplify matters: hit every switch in the boss arena to proceed. The Ghost Boss’ only move is shooting lasers, which you can counteract by either exiting an area and re-entering it or throwing a firecracker to distract him. When you’re ready, climb to the upper right area with your bubbles. |
 | Move to the upper left area, and drop down on the lower left corner to activate the first yellow switch with a Disc. This switch opens the door to your left. |
 | Then, hit the green switch above you to drop down. Sprint straight to the left right away. |
 | Do a full circle back to the upper left corner, but instead of dropping on the same place, go for the hole at the center. Sprint to the left and hit another switch. |
 | Jump up the wooden platform and stand on the green switch to activate the whale propeller above. |
 | Circle back to the whale propeller. Throw a bubble at it and stand on top to reach the passage on the upper left. You’ll step on a yellow switch on your way left. |
 | Drop down this path and stand on another yellow switch. Then, climb out through the wooden platform and head back up. |
 | Throw a Slink at the green switch on the right and stand on the last switch past the square box on the left. Time to go through that door. |
 | Follow the Squirrell and jump on the explosive. |
 | You did it. You rolled credits on Animal Well. |
Your adventures as a teeny brown blob are far from over, though. Stay tuned to find out how to get all collectibles and easter eggs in Animal Well to reach 100% completion.

Leave a Reply