
Stuck in the Throes of the Watchmaker in Sea of Stars? You’re not the only one. This DLC throws everything at you: confusing puzzles, shifting platforms, precise timing, and a boss that doesn’t play fair. It’s where a lot of players slam the brakes, wondering what to do next.
That’s where I come in.
I’ve broken this area down into clear, easy steps so you can get through without the guesswork. Just a straight path to victory, hidden treasures, recipes, and combo moves included. If you’re done running in circles and ready to move forward with confidence, this walkthrough is exactly what you need.
Table of Contents
- Table of contents
- Getting to the Town of Horloge
- Break Out of jail
- Unlocking the Train
- Ivory Towers
- Narcis King Boss Fight
- Wolf Rock
- Feral Queen Boss Fight
- Big Top
- Monsieur Tendu Boss Fight
- Pif and Pouf Boss Fight
- Pantouf Boss Fight
- The Puppeteer Boss Fight
- Dweller of Scourge Boss Fight
- All Time Runes
- How to get the Warlock Figurine
Table of contents
Getting to the Town of Horloge
Here’s how to navigate all the puzzles in the early game of Sea of Stars Throes of the Watchmaker:

Once you’re inside the clock, approach the pink device with cogs to shrink. Yes, even more!

To solve this puzzle, we need to get the L-shaped platforms on the left and right to move out of the pink T-shaped platform’s way.
First, pull the lever to trigger the grappleable log to rise.

Climb the ladder to the lever’s left and grapple to the platform on the right.

Then, jump one more time to stand on the pressure plate on the right.

To trigger the pressure place on the left, you just have to drop down, climb the stairs and jump to the left.
Break Out of jail
Once you get control of Arty, follow these steps to meet up with ale and Valere in Sea of Stars Throes of the Watchmaker:

When you have control of Arty, look for a hole in the left corner of the area. Drop down.

Climb the ladder and reach the platform above the ground. Then, jump once more to break it.

Head inside the water ripple and use the one on the left to rise back to the surface.

After a short battle, you’ll need to solve another puzzle. This one involves vents and boxes.

Use the vent on the right to jump to the top platform on the right side of this area. Push this box to ground level.

Use the vent on the left to jump to the top platform on the left side of this area.

Head inside the star door on the top left and beat the Billet Bull.

Interact with the bronze pedestal with a pink glow to cause a lever to appear at ground level.

Make sure the one box you pushed to ground level is on the southern side of the area before pulling the lever.

Then, push the box toward the elevated platform and then, to the right side.

Climb the box and then the lower platform on the right side.

Go around this platform until you reach the left side. Here, push the other box to ground level.

Use the lever to lower the elevated platform, and push the box to the southern region of the area.

Then, use the lever once more to elevate the platform and push the remaining box against it, and then to the left to block the vent.

Jump on the one open vent on top to reach a treasure chest with the Lightbulb Key.

Use the Lightbulb Key on the pink Lightbulb on the lower left corner of the room to find the exit.


At this point, you could leave. But there are other treasure chests to grab!
Lower the platform with the lever.
Push the box on the right vent to the left, then up, and to the right.
Then, push it downward and raise the platform once more before pushing it upward.
Finally, push the box on the left to the right to center it. Then, lower the platform and push it upward.
And, for the last step, push the box that’s on the south portion of the area to the right or left.
If you push it to the right and use the vent on the left, you’ll open a treasure chest with a Spectacular Scarf accessory.
If you push it to the right, you’ll get a Milkshake.

In the next room, you’ll face three pressure plates that deploy bridges. To lower the far fence, activate the mechanisms in the left and right rooms first.

Stand on the top and left pressure plates, then use the lever to deploy the bridges. Enter the left room, defeat the Billet Bull, and grab the chest on the platform to get a Brasscoat Plating.

Head back to the first area and deploy the bridges from the top (first) and right (second) pressure plates.

Grab the meal box to get 2 Ice Cream.

Back to square one. Stand on the left pressure plate and then the top one. Now, you have access to the top right room.

Shrink (even more!) to solve another puzzle. This one has to do with pushing the golden box inside the gap to activate the device.

Hop on the platforms to the left until you reach the very top. Then jump forward (toward the camera) to lower this platform.

Time is ticking! Rush to the right-side platforms and push the golden box inside the gap.

We’re halfway there. Now, back to square one. Trigger the right side pressure plate and the top pressure plate. Now, enter the room on the top left.

Same puzzle as before. So, climb the platforms on the right and push the golden box to the left and toward the camera.

Drop down to the right and then jump onto the platform in front of it.

Hurry to the platforms on the left side and push the golden box inside the gap.

There you go. The fence is down, so just deploy the top bridge to make it there.

To make it out with Valere and Zale, you’ll just have to backtrace your steps until a new exit opens up on the left corner of the bridge room.

Then, once you’re out of the water, push the star box to one of the sides to reveal a vent. Interact with it to jump out of here.

Here, you’ll find a chest with a Tumbler’s Garb. After a couple of combat sections, you’ll find the exit.
Unlocking the Train
After playing some minigames in the Town of Horloge, it’s time to get access to the train in the Rail Forest. Let’s solve every puzzle here in Sea of Stars Throes of the Watchmaker:

Interact with the pedestal with a pink glow to lower the gates on the left corner.

Climb on the rails and make your way to the top left corner of this area. Here, drop down.

Climb the stairs on the lower right corner here and then keep making your way up through the platforms.

Walk on this crane and drop down to the rails below to lower them. Then, just keep running forward.

Get down on the next area and open the chest to get a Cogweld Plating.

Climb the ledges on the cliff here to reach higher ground. Then, grapple to the left.

If you follow the path to the left, you’ll a Time Rune puzzle (see Time Rune locations) and a chest with a Green Plume accessory.

Head north and climb the terrain to reach a new area. Here, open the chest to get Riser’s Wraps.

Hop down on the rail and follow it north.

Eventually, you’ll reach a fenced area. So, drop down and climb the ledges on the left instead.

You can open a chest up the ladder to get Performer’s Finery.

To solve the puzzle, push the rail blocks from the left corner to fill the center gaps. Push the first block north, then east. Repeat the same steps for the second block.

Once they are next to each other, push the left block slightly downward and to the left. Make sure you push the other block to the left and south so it’s out of the way too.

Now, push the block on top to the right and downward.

Jump down and give it one more push; it should be fully aligned now.

Now, let’s go to the top right side of this area to get the remaining rail block.

Push the block on the left south, then right, and upward.

Give it one more push to the left, and make sure you do the same with the other rail block.

Now, just push the block on the right to fit the gap below.

Keep following the trail northwest and when you reach a dead end, grapple to the right.

After a short encounter, head to the top left corner to find a Jawbreaker.

Then, climb the platforms and go down the stairs to the left before dropping down the rails again.

When you get here, drop down to the right and go down the ladder (or just freefall)

If you jump toward the camera, you’ll find the combo Heap Frog.

You can’t use any of these switches right now, so hop on the rail and beat the enemies on the other side. Then, lower the rail with the lever.

Climb the ladder to the left and interact with the pink pressure plate. Grapple your way back to the switches.

Deactivate the rail from the left switch and activate the one from the right switch. Then, hop on it.

Cross to the other side and pull the lever to raise the rail. Grapple up to it and enter the cave. After the encounter, open the chest for a Spinner’s Bracelet. Time to shrink!

To solve this puzzle, you want to play with the witches until all two platforms are active, and the blue and yellow boxes are on the first and second floor, not the third.

Use the vent on the right to jump on the top platform and push the box toward the cog.

Next, remove the top platform and just keep the middle one. Then, manipulate the yellow box’s switch to move it back to the top floor.

Repeat the vent jumping process and push the box on the middle floor to the cog.

You probably already guessed the last step: Remove the lower platform and move the remaining blue box to the middle floor. Jump on the vent, and push the box on the lower floor toward the cog.
With this final rail in place, you’ll be able to find the train. Though he’s probably less friendly than you’d hoped.
Ivory Towers
Time to beat evil Zale. Here’s how to solve eveyr puzzle and find every collectible in the Ivory Towers in Sea of Stars Throes of the Watchmaker:

Climb the vines on the right tower and grapple to the left.

Climb again, then keep grappling to the right.

Open the chest to find a Metamaterial Lens.

Climb the vines to the right to find another chest with Recipe: Barbapapa!

Climb back to the top of the tower and drop down on top of this pressure plate to open the gates.
Keep making your way forward until you find a big door. The gates to the left will open up for you.

Inside the door, you’ll find a new room with a puzzle. Drop down to the platform with an arrow to the right, then make your way through the door with the red carpet.

Interact with the “useless pile of junk” to get a new gadget: a Mule Drone.

Use the Mule Drone to grab the square platform on the left and place it south to go back to the main room.

Here, grab the rail on the lower right and use it to go to the other side. Grab the rails again.

Climb the vines and use the rail here to get to the other side. Grab the rails again.

Climb the vines and the stairs to the left. When standing on this platform, use the rails one last time.

Finally, drop down and use the train.

Use the square platform south to get to the east side of the Ivory Towers.

Head inside the door on the lower left to find another puzzle: this one involves grabbing pieces of the literal puzzle and placing them on the right part of the portrait.

Grab Zale’s right hand, which is holding a scythe.

Then, climb the platform on the lower left and place this piece of the puzzle.

Grab the puzzle piece with Zale’s legs and climb the platform at the center to place it.

Grab the puzzle piece that looks like a shoulder; it’s in fact Zale’s left hip.
Climb the left platform and place it there.

Grab Zale’s right arm, which has a yellow cog.

Jump on the vent to the right side to land on the mid-floor platform and place this puzzle piece there.

Grab Zale’s left arm, which is holding the sword.

Hop on the left-side vent, then drop down toward the camera and grapple to the mid-level platform. Here, place this puzzle piece.

Grab the puzzle piece with Zale’s hand holding a weapon. Just hop on the left-side vent and place it on this platform.

Grab the puzzle piece with a weapon, the one that’s not Zale’s head. Hop on the left-side vent and activate the lever.

Grapple to the other side and place this puzzle piece here.

For Zale’s head puzzle piece, repeat the process you did for the previous one, but add one more step: climb the ledge to reach the top.

In the next room, you’ll face some enemies, and then it’s puzzle time. Grab the block platform near the door, then climb down the vines.

This unlocks the combo Jugglecore. Up the vines we go.

Place the platform on the left side and activate the pink pedestal.

Now, go to the right side and activate the lever. Don’t worry, use the cog to get back.

Place the platform on the remaining hole to exit this area.

Once outside, climb the vines and head inside this door at the top of the tower. Inside, just shrink down and push the arrow button.

Back outside, head to the main passage and place the platform on the north hole to find the door with the arrow buttons. We’ll need to find three more, so let’s get started.

Back in the left Ivory Tower, turn into spirit form to use this bridge.

After an enemy encounter, head inside this new tower to find another narcissistic puzzle: a statue.

Climb the vines on the right side and activate the lever to get the legs. Push it to ground level.

Now, climb the vines on the left side and activate that lever. Push the block (torso) to ground level.

Now, if you touch the green device on the back of the room, a platform will elevate you to the final lever and block: the head. Push it to complete the statue.

To solve the mirror puzzle, switch to Zale. Stand in front of the mirrors and press the ground buttons to match the pattern shown. For this one, it’s just the center button.

Grab the mirror and place it on the remaining frames, replicating the process.

At the top of the tower, open a chest to find a Runebound Plating.

Here, shrink to activate the second arrow.

Outside the new tower, climb the vines on the right to find a chest with a Glass Cannon accessory.
Inside the new tower, you’ll find a Merchant who sells a new recipe: Caramel Corn.

To solve the paintings puzzle in this room, you’ve got to press the paintings in the following order: painter, writer, guitarist, sculptor.

Open the chest in the next room to get Daredevil’s Raiment.

Would you look at that, there’s another puzzle here! Go through the arrowed doors to time the yellow crystal’s movement so it reaches the big door on the final step.

So for this one, go through the main door once, and then go through the center door.

For the second wave of doors, start by going through the third door. Then, go through the first main door, and finally, go through the last door.

For the next wave, start by going through the fourth door. Then, try the third. Then, second, and finally, first. Now, get outta here.

Once you reach the top of the tower, it’s time to shrink, face some baddies, and get the third arrow button.

As you make your way to the fourth Ivory Tower, look for a ladder blending in with some rusty cogs. Push it and open it, inside this room, you’ll find another Time Rune. (See Time Rune locations)

When ready, head inside the last Ivory Tower. You’ll be greeted by the statue podium puzzle.
To solve it, place the Zale statue with crossed arms to the right. That’s his rightful place.

Then, push the Zale statue that’s showing off his muscles to the right.
Next step is to push the that’s saluting toward the camera.

Then, push the Zale statue with the arms toward that one. Finally, push the statue with the arms toward the podium.

Two steps and you’re done: One, push saluting Zale to the podium.
Two: climb the stairs and activate the lever.

In the next room, use the Mule Drone to move the grappleable device and platforms. First, place the device in the top-right gap to access a treasure chest with the Tossmaster Bracelet.

Next, grab the platform and grapple the log to get back to the center.

Temporarily place the platform near the closed door. Have the Mule Drone move the grappleable device to the left. Grab the platform before grappling left.

Place the platform on the gap to the back, then climb the vines to reach a pink pedestal.

Interact with it, and come back to the center platform. Again, drop the regular platform temporarily on the gap leading to the door.

Grab and place the grappleable device toward the south and bring the platform you temporarily put down with you.

Place the platform on the gap to the right and interact with the remaining pink pedestal.

Get out of this room, and in the next one, shrink to press the last button. It’s time to go through the big door to confront evil Zale.

Narcis King Boss Fight
Moveset:
Regular attack: Slashes single target twice before sending his swords flying, catches them, and performs one double-slash. The only parriable slash is the last one, so ignore the rest.
Reverse Sunball: Conjures a fireball and splits it in three to throw it at all party members.
Symmetry of Sin: Deadly attack that throws slashes at all party members several times. Can K.O. party if not parried or prevented.
To win this fight, you’ll pretty much just have to avoid Symmetry of Sin. It can happen once or twice, but more than that will wipe out the party. Just make sure to hit the crank once or twice when he’s charging his ego in the mirror. Do not use AoE attacks like Trampoline or Leap Frog, as they can be unpredictable and end up with an active mirror.
Wolf Rock
With evil Zale out of the way, now it’s of course Valere’s turn. Here’s how to find every collectible and solve every puzzle in Wolf Rock in Sea of Stars Throes of the Watchmaker.

Enter Wolf Rock and, when you’re ready to go deeper into the caves, climb the platforms on the right.

Grapple to the rocks on the other side of the gap and head outside.

Climb the ledge on the left to reach the narrow door and drop down through the hole.

Get out of the water and grapple to the rocks to the right. You can interact with the crystals to turn on the lights.

Grab the platform with the Mule Drone and bring it through the narrow passage to the left.

You’ll find a spot to place the platform southwest of the lake. Turn on the lights on the other side.

Here, you’ll find a box puzzle. First, push the box to the right downward.

Push the box to the left further to the left, and downward.

Then, do the same for the box on the right, and give it one more push to the left to fit in the designated space. This lowers the platform.

Push the remaining box upward, to the right, and downward. It can go through, but here’s how we’ll open the way.

Push the box you left on the designated spot to the left, to the right and downward. While it stands next to this platform, climb it.

Time can run out, so rush to the other box and push it downward.

Follow the passage in the center and grapple to the other side.

Follow the path of climbable rocks ahead and deploy the ladder here.

Go back to where you placed this platform and grab it.

On the northeast corner of the lake, grapple to the rocks to head back to where you were.

Follow the rocks again and place the platform in the gap northeast.

Here, you’ll find a chest with the Milkshake Recipe. Congrats, that’s all the recipes in the DLC!

Now, climb back to the mountain with rocks and place the platform in this gap and jump down. Brace for battle!

Again, grab the platform with the Mule Drone and bring it to a gap that’s east. This is the way forward.

After a tough battle with the wolves, go down the ladder and grab it before grappling to the rocks on the right.

Place it on the mountain to the left and climb the rope before taking out the nail.

Place the ladder on the right mountain and repeat this process.

You can then climb the rope to the left and remove the nail there.

Finally, climb the rocks to reach the narrow platform above and hop to the center platform to reach the last nail.

You’ll have to repeat this process to cause the platform to drop down. Then, go down the water ripple.

When you reach the exit, look to the left to find a chest with Aerialist’s Wraps.

Climb the rocks to reach the platform above and jump into the water.

If you climb the platforms on the right, you’ll find the combo Galette des Rois. Then, use the water ripple.

After a short battle, head left to find a save point and a chest with an Arcforge Plating.

Then, climb the rocks and the ladder to the right. We need to open that lock, but first, we’ll need a key.

Go inside the cave’s short door, and grab the Bridge’s Key on the other end.

Use the Bridge Key on the lock and go across it.

Use the grapple to reach the rocks ahead and climb then. Then, grapple to the left.

Once you’re up here, grapple to the right.

If you go down this path of rocks, you’ll find one of the Time Rune puzzles.

After a brief combat encounter, climb the rocks to the right

Then, grapple to the rocks behind you.

As you stand on this platform, drop down.

Down here, go through the door.

In the next room, you’ll find some enemies, and a path of rocks to climb.

Up here, grapple to the left and go across the wooden log. There’s a cave to your left.

Go through the door and grab the square-shaped platform.

Place it on the gap on the door’s lower right. Now, feel free to grab the power bolt on the left.

Power up the platform to fill the grap north with a bridge. Go through it.

Push the box in this area to the south end of the bridge and take the power bolt. Stand on the box to grapple to the other side.

Here, you’ll face another puzzle. Put down the power bolt and climb the rocks until you reach the star-box. Push it.

When you take the power bolt, water rises here. What you need to do is place the boxes in a way that covers both pipes on the north wall so the water level rises high enough for you to leave.

The wooden box should cover the pipe on the left, as wood floats and this pipe is higher.
The star box does not float, it sinks, so it can cover the pipe on the right.

Take the power bolt and swim to the wooden box to reach the platform above it.

Place the power bolt on the area south and grapple further south.

Then, climb the ladder on this side and make your way back north to find a deployable ladder.

Grab the power and bring it to the southern side of the bridge via the higher platform.

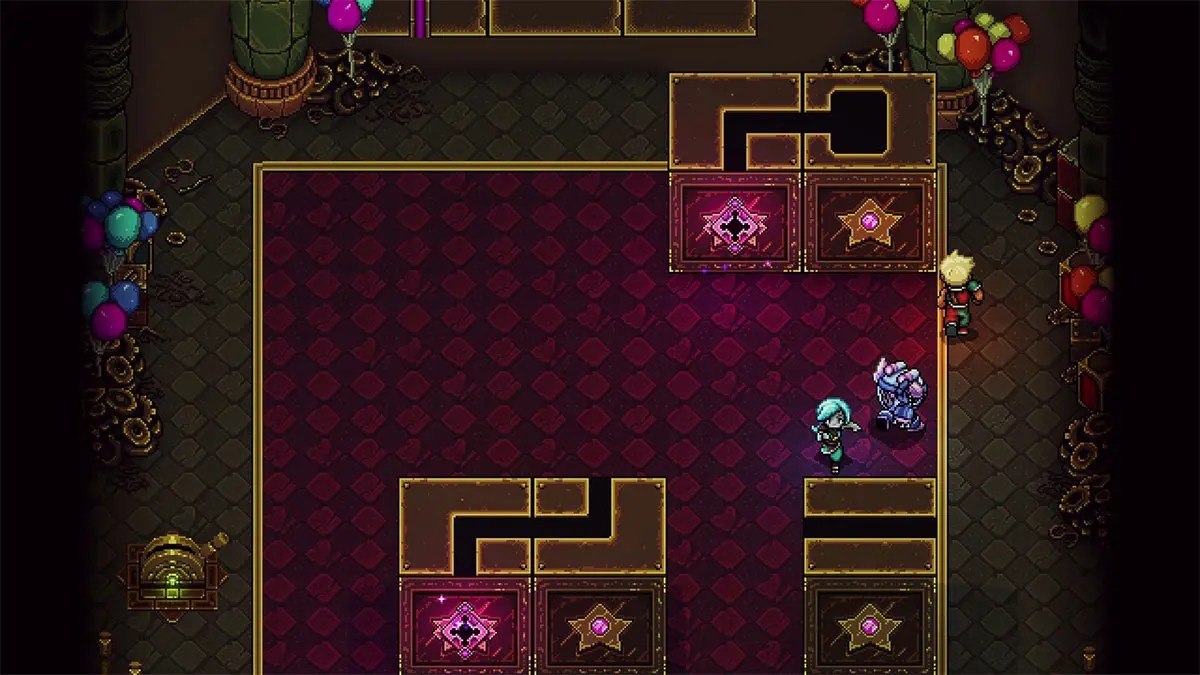
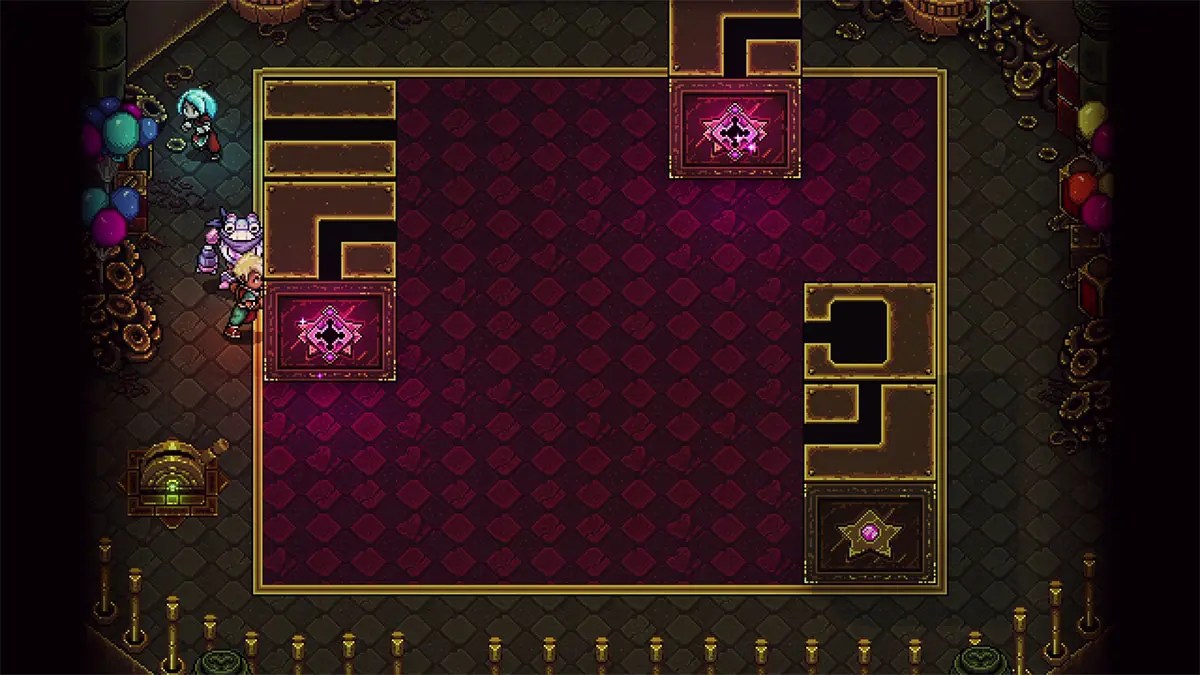
In the next room, you’ll find a puzzle: you’ve got to hop on the platforms in the correct order to exit. If you fall, howerver, you’ll get some goodies… and enemies.

Jump on the wolf to the left, the moon to the right, and the star below it.

Then, jump on the wolf to the left, the moon below it, and the star below it.

Finally, jump on the wolf below it, the moon to the right, and the star below it.

Jump on the wolf below it, the moon to the right and the star to the right.

Jump on the wolf below it, the moon below that, and the star to the left.

Here, just step on the wolf and exit.

In the next room, we’ll need another Bridge Key. Grapple to the platforms on the right.

Deploy the ladder and go inside the cave.

After a combat section, grab the Bridge Key.

Climb to the platform above and go down the ladder you just deployed. Then, use the water sewer to jump back to the lock.

Go across the bridge and enter the new cave.

Use the grapple to pull platforms on the right.

To activate these platforms, you must push the blocks with the pink arrows to the gaps on the left and right. Now, you’ve got to push the one with the left arrow to the left, and the one with the right arrow to the right.

Push both blocks to the left. The Right Arrow block should be below, while the Left Arrow block should be above.

Push the Left Arrow block to the right.

Push the Right Arrow block upward, to the right, and down.

Now, push the Right Block slightly to the right.

Push the Left Block to the left.

Push the Right Block downward and to the right.

Now, push both blocks back.

Pull the grapple to the right.

In both cases, use the grapple to stand on the tiny gap between the cliff and the block and push it toward the wall and then to the pressure plate. This will activate the door below

Further ahead, you’ll find a chest with a Grand Marvel Regalia.

Keep climbing the rocks until you reach this cave. Grapple ahead.

Climb the rocks until you reach the platform on the left and grapple tot he right. Here, activate the pedestal.

You could grab the Bridge Key and bounce out of here, but if you climb the rocks to its right, you’ll reach a treasure chest with a Leeching Circlet.

With the key, deploy the bridge and get out of here.

After losing Valere, just keep heading east until you find a resting point. The boss fight is right ahead.

Feral Queen Boss Fight
Moveset:
Mole Vault: Charges toward an ally underground, launches them into the air, and then slams them against the ground.
Full Moon: Charges up and then slashes all allies multiple times.
Buiss Roulette: turns into multiple bushes, gives you four turns to figure out the right one before attacking you with Carni-Kiss.
To win this fight, you’ll just need to hold on and try to outlast these attacks as best as possible. Interrupt Feral Queen’s charging attacks as much as you can to avoid taking damage, but it’s just a test of endurance, really.
Big Top
Our evil alter egos are dead, now it’s the big bad’s turn. However, before we can face her, we’ll have to deal with a bunch of other lesser enemies in Sea of Stars Throes of the Watchmaker.

Monsieur Tendu Boss Fight
Moveset:
Regular attack: Hits enemy with the clock twice.
Mirage Toss: Projects different versions of himself and rolls them into you. Keep your eyes on your own characters and parry when one is about to him them.
Mantra: Charges up a healing conjuration. You’ve got plenty of time to interrupt it.
Because of Mantra, this boss fight can stretch out for quite some time, but if you can endure it, you’ll conquer Monsieur Tendu eventually.

We’ll need to get six Entry Stubs to progress. Let’s start by heading southwest. After beating some enemies in the tent, you’ll have to solve a puzzle.

Grapple to the left side of the tent and grab the power bolt.

Grapple to the right side, go down the stairs and drop the power bolt here.

Hop inside the cannon and up you go. Here, grab the square-shaped platform with the Mule Drone.

Place the platform to form a bridge south. Then, grab the power bolt and bring it back up here.

Drop the power bolt on the slot up the ladder and go back down.

Grab the platform and place it on the platform up the ladder to generate a ledge. From it, you can grapple to the right.

Climb the ladder on the platform to the right and drop down on the left platform.

Here, grab the power bolt and, through the ladder leading up, take it to the right side.

Once it’s powered up, drop down, and climb the ladder to the left. Here, grab the square platform and drop down again.

Place the platform to create a bridge once more, and grab your new ladder.

Take it all to the southern portion of the tent, then grapple to the left. Here, place the ladder.

Head back north, grab the power bolt from the right side, and take it across the bridge to power up the splot on the southern left corner of the tent.

Go up the ladder and across the rope. Use the grapple to pop the balloon and get two Entry Stubs.

Head back to the main tent, and exit through the bottom right door. Then, find another tent with a puzzle. This one involves trampolines.

If you approach the back of the room, you’ll find a Fruity Roll.

Now, the first step to solve the puzzle in this tent is to interact with the pink pedestal on the second floor.

Then, climb the ladder on the left and push the star block with the trampoline. Below, push it to the bottom left corner.

Climb to the second floor and jump off the ledge toward the trampoline to hit the first switch.

Push the box to the top left corner now, and climb to the third floor.

Jump down from the top left edge and interact with this pink pedestal.

Push the box to the bottom right corner and climb to the third floor again. This time, jump off the bottom right ledge.

Climb this ladder to get a Grand Marvel’s Regalia. Then, grab this ladder and drop it on the third floor.

Move the trampoline block back to the bottom left corner and use it to reach the lever again.

Climb to the fourth floor and jump off. Here, press the pink pedestal.

Finally, climb to the fifth floor and pop the balloon to get 2 Entry Stubs.

Pay the ticket machine on the right side and use the cannon to jump to a higher platform. Here, drop down to enter the tent below.

Head inside the main tent in this area and open the chest to get Skybound Wraps.

Climb the ladder on the right and jump on the seesaw.

After a brief combat, a bird-like device appears. Blow air into it to prompt the villager platform to go around the stage until it reaches the bottom left corner.

Climb on the platform southeast and jump on the seesaw again. Then, grapple the log and interact with the pink pedestal.

Next, you must replicate the image behind the curtain using the villager platform. Just spin the bird device until it’s on the bottom square.

Now, you must do the same but with two villager platforms. The problem is, they’re right next to each other.
Have the first villager platform stand on the bottom left corner of the stage, and jump on it with the seesaw.

Then, have them spin so one is on the left-side square, and the other one is in the top one. You’re the missing piece: stand on the right square.

Spin the bird device twice until the platforms form a semi-bridge.

Outside the tent, defeat a group of enemies and interact with the pink pedestal next to a hand.

Back in the main tent, pay 3 Entry Stubs to the ticket machine on the left side and hop inside the cannon. Grab a Milkshake from the can and then drop down.

Drop down to the platform below and grapple to the left.

Defeat a group of enemies and interact with the pink pedestal.

Climb the platform to the right, and grapple the ladder.

Inside this tent, you’ll have to endure several battles. You’ll also find a chest with the Starborn Bracelet and two Entry Stubs.

Outside, go up the stairs to activate another pedestal. Use this platform to head back to the main tent.

Once you head inside the clown’s mouth, you’ll face Pif and Pouf.

Pif and Pouf Boss Fight
Moveset:
Front wheel crash: Pouf crashes his cog bike’s front wheel into an ally three times.
Cymbales Shield: Pif deploys a music shield around both. Resists three hits, perfect for AoEs like Cannonball Trampoline.
Arc slashes: Pouf deals group-wide wave damage with arc slashes. Can be parried.
With their limited moveset, it won’t be long before you bring these two down, but they’ve got a backup plan.

Pantouf Boss Fight
Moveset:
Regular attack: Jump and smashes an ally into the ground.
Hypercüt: Sends a teammate flying for a couple of turns, then crashes into the ground and is left with 1 HP.
Pouf in the box: Opens up a magical box to reveal a ton of random objects falling from the sky.
Pif in the box: Pif comes out of the box and heals Pantouf.
This is the real boss fight. Do your best to interrupt Hypercüt and Pif in the box, the rest of their moves are easy to parry or survive. It’s a long-ish boss fight, but you can make it if you interrupt as much as you can.
Back in the main tent, climb the ladder on the left and go inside this area’s tent. To solve the puzzle, you’ve got to complete the path in time. By pulling the platform up the stars toward you, you’ll unblock the pressure plate to reach the balloon.

Before we get started, check the back of the room to find a Sour Licorice.

First, grapple to the platform to the left.
Then, grapple northeast to get to the other side.

Climb the ladder and jump into the trampoline.

Stand on the northwest corner of this platform and grapple northwest.

Go around this platform and grapple southwest.

Hop on the trampoline.

Grapple southeast. If you made it on time, the fence blocking the balloon should go down.

Back in the main tent, head out through the door on the right.

If you go down the ladder to the tent’s southeast, you can get another Time Rune.

Once you’ve caught it, head inside the tent. Grab one of the three trampolines on the second floor with the Mule Drone and place it on the first floor.

For now, the second one and third one should be on the second floor. Stand on the platform next to where the trampolines were and jump down.

Head to the third floor’s right side ledge and jump off to reach a chest with an Infinity Lens.

Now, grab the trampoline on the second floor, the one on the right.
Again, head to the ledge on the second floor, right next to where the trampolines were.

After a short combat section, place the trampoline on this spot.

Jump down from the edge on the right to make it to the fourth floor.

Here, head all the way to the left and jump off. Pop the balloons to get two Entry Stubs.
The Puppeteer Boss Fight
The Puppeteer will control different Wheels’ figurines that can deal damage based on the slot machine results. You can manipulate the results by hitting them, but it’s random, so I’d just focus on hitting the figurines instead. Their regular attacks deal 20 damage anyway, so it’s definitely bearable.

Dweller of Scourge Boss Fight
Normal Attack: Hits all party members for around 20 damage.
Gas Attack: Fires several gas clouds at one character, doing around 50 damage.
Cog Rain: Powerful attack that charges over time. When fully charged, several tiny cogs appear on screen, followed by two large cogs from the upper right. Hits both characters for around 90 damage. Be fully healed before this lands.
Sap: Triggered when you see a pink cloud in the boss’s right hand. Hits both characters for around 40 damage and heals the boss for 740 HP. Try to prevent this.
When you get bigger, defend when you see these lines; otherwise, attack:
Dweller of Scourge is checking the situation.
Dweller of Scourge puts on a serious look.
Dweller of Scourge needs a breather.
Dweller of Scourge is hesitating.
All Time Runes
At the center of the town of Horloge, you’ll find a puzzle that actually contains one of the game’s most pivotal rewards. To access it, you’ll need to find all the Time Runes in Sea of Stars, which you can find a guide for below:
Time Rune 1
Time Rune 2
Time Rune 3
Time Rune 4
Time Rune 5
Time Rune 6
Time Rune 7
Time Rune 8
Time Rune 9
Time Rune 10
Time Rune 11
Time Rune 12
How to find
How to solve puzzle


Found in the town of Horloge, inside the tent with a skull.
To get this Time Rune, unlock the Warlock Figuine (see below) and master all three opponents in this tent at a Champion Game.
How to find
How to solve puzzle


Found in the town of Horloge, inside the tent with a skull.
To get this Time Rune, head to Goodies’ Pond and swim toward the waterfall to find a hidden water ripple. Go through it and shrink to find a puzzle.
To solkve it, you’ve got to move the pieces until you make the same of a watch.
How to find
How to solve puzzle


Found in the Rail Forest
A bit past the first save point, you’ll find a climbable ledge and then a grappeable log. Here, instead of heading north to follow the main path, look for a narrow path left.
Rotate the mechanism starting from the outer cog to the center one to form a triangle with spikes behind it.
How to find
How to solve puzzle


Found outside the Ivory Towers
- Swap the plates to lead the way from th e top left corner to the top right corner
- Swap the top left curved tube for a horizontal straight one.
- Swap the center left tube for one that’s curved to the right.
- Swap the center tube for one that’s vertical straight.
- Swap the center right tube for one that’s curved upward.
How to find
How to solve puzzle


Found in the Ivory Towers, after activating the third arrow rune for the door.
Look for a deployable ladder blending in with the rusty cogs and head through the door.
Activate the ladders shown in the picture to make the outline of the evil Watchmaker’s face with the green shadows.
How to find
How to solve puzzle

Found in a tent in Horloge. Only unlocked after you’ve got access to the Mule Drone.
To solve this puzzle, you must align the boxes to replicate the path shown above.
Arrange your block until they replicate the picture on the left.

Push the glimmering L-shaped block upward.

Push the straight block up, and to the left.

Push the remaining L-shaped block that’s south, to the right.

Push the glimmering block back down, and push the straight block to the left.

Push the last block, the one with the square-shaped hole, down.
Push the glimmering box upward and then to the right.

Push the tube up, right, and down.

Push the L-shaped box on the bottom left to the right.

Push the L-shaped glimmering box on top, downward.

Push the L-shaped box that’s out of place to the left and down. Final push to the right and you’re done.
How to find
How to solve puzzle


Found in Lost Island, inside the second shrinking device left to right.
To solve this puzzle, you must rise/lower the platforms to form a connection to the purple tube above.
The first two platforms should be risen to the same level. Then, the platform on the top left should be a bit higher, and finally, the platform on the top right should be touching the tube.
How to find
How to solve puzzle


Found in Wolf Rock.
After the acquiring the first Bridge Key, look for a path of rocks that leads down to a cave.
Guide the device from the top-left to the top-right corner by deploying bridges.
Start by pulling the lever to rotate the first bridge and move the device. Quickly rotate it again, grapple down, and repeat until it reaches the end.

You can unlock this puzzle in the Town of Horloge. Look for a star box near the shooting range tent.

Walk past the star box and hug the wall to the left until you find yourself on a cliff. Drop down and climb the rope.

When you can no longer see yourself or your companions, push the box downward. Climb the platform on the upper left to find a secret passage.

Keep going until you find a shrinking device and jump in.

To solve this puzzle, you’ll need to push the tiny cog boxes to the left. However, you only get one chance to get them in the right order or you’ll have to start over.

Pull the red lever on the left. Then, jump down to the lower platform and jump and grapple to the right side.

Do not push this box yet. Instead, jump o the left side and climb the stairs.

Push the top left cog box to the left.

Then, push the middle right cog box to the left.

Finally, push the bottom left cog box to the left.

Finally, use your grapple on the platform on the bottom center to pull it toward you.
This will prompt the balloons to fly out into Horloge. Head to the town’s west section, where you’ll find these balloons and grapple to them.
Follow this path and drop down the ladder to find a chest with the Certificate of Balloonery.
Pester the guy inside this tent for a couple of times until he asks for the Certificate of Balloonery.
Shrink and fight the enemies to get the Time Rune 9.
How to find
How to solve puzzle


Found in Lost Island, inside the first shrinking device left to right.
- To solve this puzzle, head to the rightmost portion of this area, grab the grappeable device from the left.
- Then, climb the stairs, and drop down to place the grappeable device and pull the lever.
- Climb back up and grapple to the right.
- Climb the ladder and drop down behind the gate. Stand on the pressure plate.
- Grab the grappleable device and place it on the spot to the left.
- Pull the lever and use it to grapple to the left.
- After a combat section, drop down and pull the lever from the area below, and use this grapple on the spot above the ladder. Lever again!
- Pull the lever at the start of the dungeon, and before time runs out, grapple to the right.
- Pull this platform at the end to get the Time Rune.
How to find
How to solve puzzle


Found in Big Top, in the area with the last tent post- Pif Pouf fight.
To solve this puzzle, move the screws out of the pedstals to place the crystals.
The best strategy is to try and move the screws to the top, bottom, left, and a right rows while making scpace for the center.
Obtained when you complete the game’s main story.
How to get the Warlock Figurine
To get the Warlock figurine in Sea of Stars Throes of the Watchmaker, you must fish all four types of Goodie Bags, speak to an NPC in Were Lake, and fish it out of the water.


First, visit all three fishing spots in Horloge: Goodies Pond, Bounty Basin, and Were Lake.
Make sure you fish every type of goodie bag. Small Goodie Bag, Medium Goodie Bag, and two types of Big Goodie Bags, a red and a yellow one.

The next step is to speak to the Master Fisherman in the Were Lake. He’s just standing in the southeast corner of the lake. If you prove you’ve caught all four types of fish, he’ll give you a Hook Magnet.

Then, approach the pier and fish out the item with the purple glow: that’s the Warlock Figurine.


Leave a Reply